

Who is your closest companion or assistant in Flutter? In my viewpoint, the best combination is ctrl+spacebar in my VScode. While developing the app, it is useful to learn about all of the properties that will be used to assign widgets. Let us lower our voices and take more action. Now let us turn our attention to our concept. Today we will learn about the most wanted topic in flutter, and once we understand these fundamentals, we will be able to perform better in flutter.
ListView.builder
It helps in the creation of a long list by producing a scrollable, linear array of widgets that are generated on demand.
You have one question now. How to make the best use of the ListView.builder.

There is an Appbar widget with the text “Pens That We Have.”
That’s something you’re already familiar with, so I won’t go into detail about Appbar.
ListView.builder was created within the body.
First, when creating ListView.builder, you must consider the following steps: What are the steps.
- Create the Data source
- Convert Datasource into the widget
- covert the widgets to children in ListVeibuilder
Create the data source
Here you will gather details about some pen names and prices.
So I decided to create a blueprint, which means I’m going to create a model of a pen that includes the name and price.
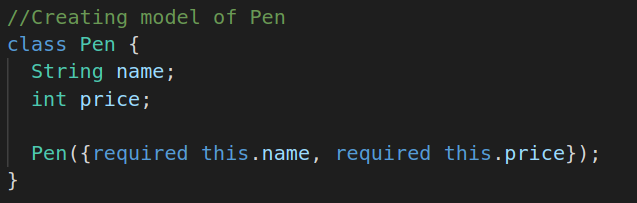
So, using a model, I’m going to create various varieties of pens, which I’ll then put into a list and label “pens.”
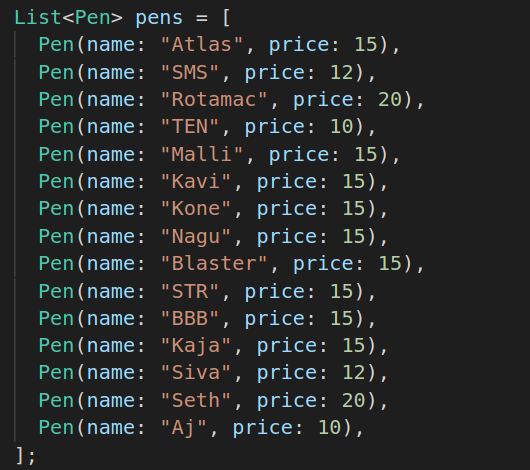
Okay, I’ve built a data source, thus the first step is complete.
2.Convert the data source into the widget
Then we proceed to the second step, which is to convert the data source into a widget. It refers to the type of widget you will use to display each item of the list, which is most likely inside the list view builder (most of them use ListTile), but this is not required; you may use Container, card, etc.

3.Covert the widgets to children in ListVeibuilder
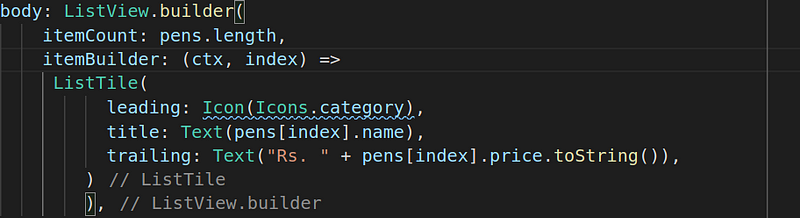
Now , We’ll look at the final step, which is to convert the widgets to children in ListView.builder. Inside ListView.builder, we must pass itemCount and itemBuilder, as well as several arguments that are optional. I passed the length of the list as the value of itemscountProviding a non-null itemcount improves the ability of the [ListView] to estimate the maximum scroll extent.
itemBuilder should always return a non-null widget, and actually create the widget instances when called.
Inside the itemsBuilder, we must pass a function with context and index as arguments and return the child’s widget. So, since we already created the ListTile widget, I’ve returned it as shown below.
It contains a lot of items. Still, our application is memory efficient, because ListView.builder simply calls the method only for those items that can visible on the screen. The rest of the items beyond the screen are not loaded into memory, which saves memory.
In the beginning of this article, I mentioned ctrl+spacebar because no one knows all of the properties of widgets. This shortcut will help you make your app more efficiently. Now, if I press ctrl+spacebar inside the ListViewBuilder widget, you will see like these.
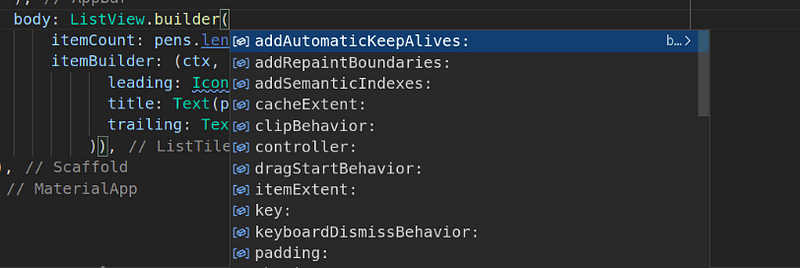
There are several properties available in the ListViewBuilder widget.
GridView.builder
It is similar to ListViewBuilder. We should pass two arguments .
1.gridDelegate
2.itemBuilder
In gridDelegate, we usually pass SliverGridDelegateWithFixedCrossAxisCount(), which builds a delegate that creates grid layouts with a fixed number of tiles in the cross axis. Okay, we can send the mainAxisSpacing, crossAxisCount, and crossAxisSpacing arguments to SliverGridDelegateWithFixedCrossAxisCount(), but they must not be negative.The only required property of SliverGridDelegateWithFixedCrossAxisCount() is crossAxisCount, which tells us how many children are in the cross axis.
We use crossAxisSpacing to keep a social distance between children (put space between each child along the cross axis.) and mainAxisSpacing (put space between each child along the main axis.)
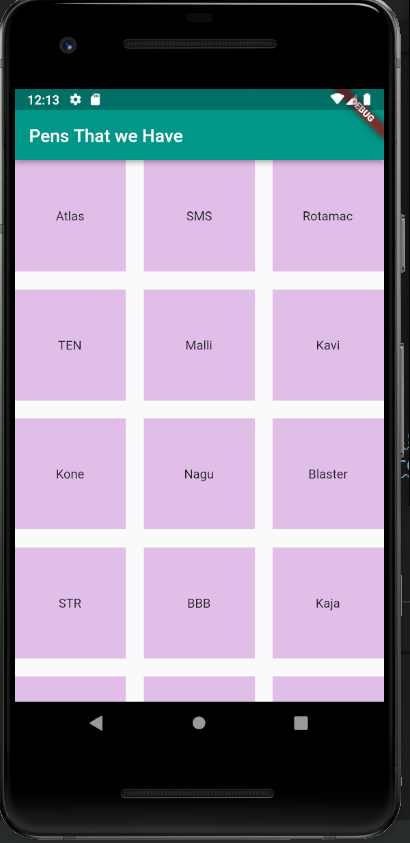
The image above represents a wide number of containers in grid view that contain the text widget.
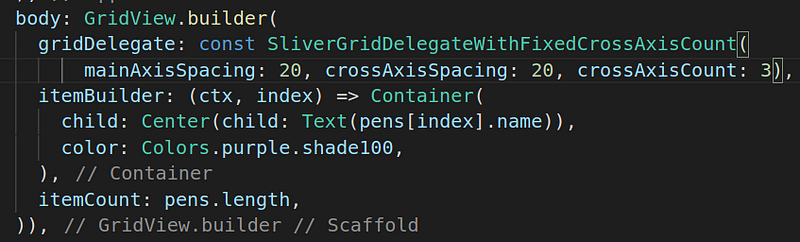
In addition, we pass itemCount; otherwise, you may receive a Range Error.
You can also make a child clickable by using the Inkwell widget or the GestureDetector to perform specific actions.
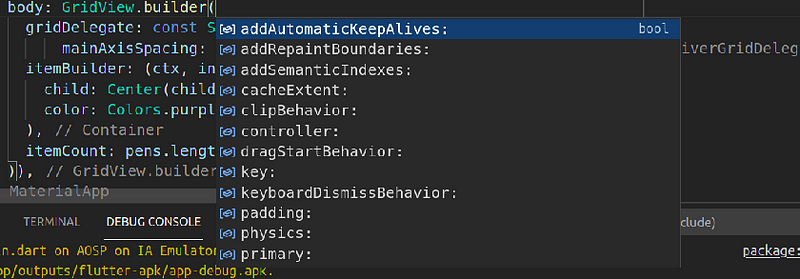
I’ve already shown you how to see all of the properties that we have access to.
Now we shall look at some properties.
scrollDirection: Axis.horizontal
It will scroll left to right.
physics: NeverScrollableScrollPhysics()
It creates scroll physics that prevents the user from scrolling. We cannot scroll.
reverse: true
It will be used to reverse the items in the list.
dragStartBehavior: DragStartBehavior.down
It will be used to drag the grid from the bottom to the top.
I hope you enjoyed this story. If you have any questions or need clarification, please leave them in the comments below or contact me on Twitter.

— — — — — — — — — — — — — — ThankYou — — — — — — — — — — — — -


0 Comments